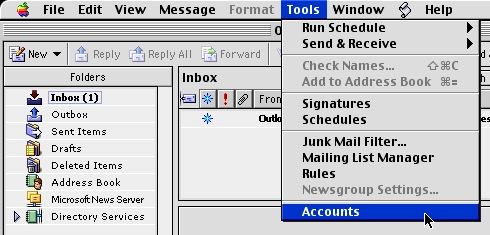
Open Outlook Express.
Click on the 'Tools' menu and then click 'Accounts'.
The following walkthroughs will help you easily transition your email. Once you have your email client configured with the proper settings, you will be able to send and receive properly on our new and improved website hosting platform.
Please enter your name and email address below for a customized walk-through:
|
Open Outlook Express. Click on the 'Tools' menu and then click 'Accounts'. |

|
This will bring up the 'Mail' tab. Click on the problematic account and click the 'Edit' button at the top. |

|
This will open up to the 'Account Settings' tab. Make sure that your settings look like the settings shown in this screenshot. The following are the most important:
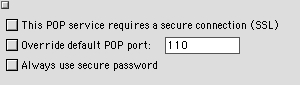
Once your settings look like the settings shown in this screenshot, click on the 'Click here for advanced receiving options' button below 'Save password'. |
|
Make sure that none of the boxes are checked, then click the top left square to close that window and return to the main 'Account settings' screen. Click on the 'Click here for advanced sending options' button below 'SMTP server' at the bottom of the screen. |
|
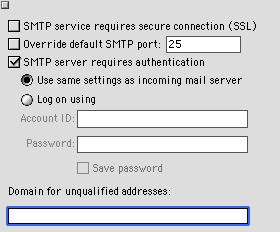
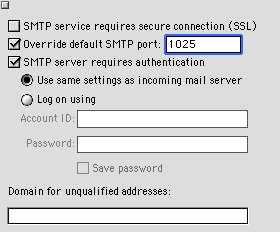
The settings for your outgoing mail server (SMTP) are shown here. Make sure that your settings look like the settings shown in this screenshot. The following are the most important:
Click the top left square to close that window and return to the main 'Account settings' screen. Click on the 'Options' tab. |
|
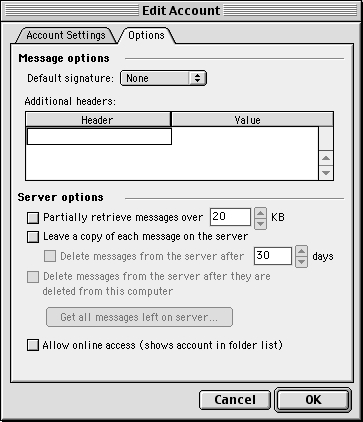
Make sure that your settings look like the settings shown in this screenshot. The following are the most important:
Click 'OK' to close the window and save any changes if it prompts you. You should now be able to send and receive email. |
|
|
|
|
CANNOT SEND EMAIL?If you can receive email however you cannot send email and the settings are exactly as shown above, change your outgoing mail (SMTP) port from the default of 25 to 1025. To do this: Click on the 'Tools' menu > 'Accounts' > 'Mail' tab > Highlight the account > 'Edit' button at the top > 'Account Settings' tab > 'Click here for advanced sending options' button below 'SMTP server' at the bottom of the screen. Put a checkmark in 'Override default SMTP port' and change it from 25 to 1025. Background Reasoning: In order to combat spam, some Internet Service Providers (ISPs) block traffic to external servers on port 25 so that customers using that ISP can only use the ISP's mail server. If that customer is going to spam, the idea is that they must use the ISP's mail server to spam and therefore be caught very quickly, and handled accordingly. Realizing that many ISP's mail servers have a more restrictive options (ie. not being able to send to more than 100 people at a time) as they are usually residential mail servers, we have opened an alternative port to allow you to send mail using our mail servers, one that the ISPs do not block. That port is SMTP port 1025. |
© 2026